News
Major toolsets could be coming your way.
Posted on Feb 13, 2013
Posted on Feb 13, 2013
Is an asset a brick, or a factory?
Houdini Digital Assets (HDA) can be as small, like simple material shaders, or large like a suite of tools with major Plug In functionality.Of course there's a description for each asset at the store, which helps a lot. But really you need a test drive to truly appreciate what you're getting, whether it be a brick, or a whole factory!
Trial period makes it risk-free
When you download an asset, you're not just getting a polygon model, you're getting software. Which is why we refer to them as "smart" assets . Features and functionality vary from one asset to the next, and authors price them accordingly. We appreciate the value of your hard-earned money, so we've included a free trial period with every asset. You can try before you buy, and be confident with the asset before you've been asked to pay a cent.We're starting to see more ambitious works uploaded at the asset store. Which is great! We're thrilled at the prospect of seeing these larger scale assets, and want to encourage you to use the free trial to evaluate them..and to offer feedback as well!
Let you developers know what you think.

Example files are good as Gold
Posted on Feb 06, 2013
Posted on Feb 06, 2013
-
Example files Rule!
- Go to the asset browser.
- RMB>Load Example File over the asset.
There has been a lot of positive feedback about the example files which come with assets from the Orbolt Smart Asset store! To a customer checking out an asset for the first time, these files are almost as valuable as the asset itself.
There are a few ways to check out these files. Firstly, on initial download, an example file should open which demonstrates the assets key values. Secondly, once you've downloaded the asset, you can always return to this example file:
Authors Can Add Extra Help Files
Example files are a great starting place for customizing assets. If you're an author and you'd like to add a second or third hip file, you can send them directly to support@orbolt.com and we will host the file and provide you with the url to paste into your asset description!If your help file is render-ready, there's a good chance that it will get featured on the Homepage!
We want to show off your work!
How to add inputs to your asset
Posted on Jan 31, 2013
Posted on Jan 31, 2013
Author Tip: Asset inputs
Asset authors need to predict how their assets will be used, and expose all the right functionality to their customers. One of the most basic, and occasionally overlooked features, is the simple ability to allow the asset to be parented to other objects.By default, you can parent to an asset, but not make a child of it (parent it to another object).
This is simple enough to change though.
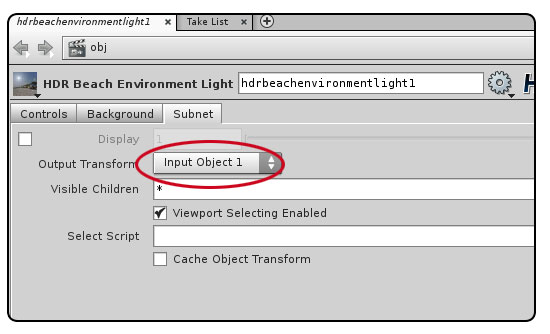
Change The Default Input Value
Basic tab and change the maximum inputs to 1. This will add an input to your asset node. You can see this change in the network view.
Set The Output Transform
Now that your asset can be parented, you can optionally specify ANY node in your asset to be used as the transform. By default "input1" is used, which will be the top of your hierarchy. Usually this is what you want.Occasionally, it's useful to specify something different, perhaps lower down the hierarchy.
e.g. A specific transform node with a custom pivot point.
Checkout problems with PayPal and Visa on Jan 28th 2013.
Posted on Jan 29, 2013
Posted on Jan 29, 2013
PayPal had issues yesterday
To all of you who were affected by PayPal's service interruption yesterday, we offer our apologies for any hassle. Read the news HERE .We have made changes to handle this kind of interruption better, should it reoccur.

Apparently PayPal wasn't the only one to experience grief yesterday. Visa was also affected all across Canada. read more HERE .
Are there any conspiracy theorists out there who think that the timing of this is a little weird, just a few days after the last Anonymous sentencing ?
Adding Images to Help Cards
Posted on Jan 27, 2013
Posted on Jan 27, 2013
- Custom Icon, usually small (48x48) at the top.
- #largeicon: opdef:.?Image.jpg
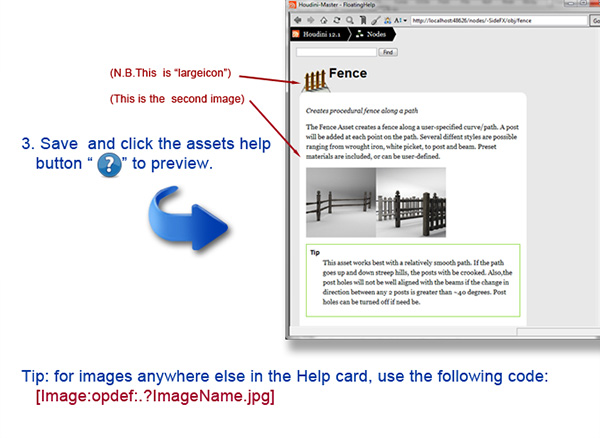
Add Images to help cards
Here's an image which demonstrates how to include custom images in your digital asset's help card.In order to display these images, they must be embedded into the "extras" tab of your Asset.
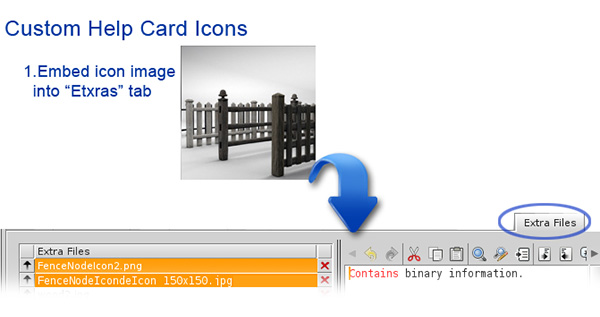
Then they need to be referenced in using text in the "help" tab.
Most images can be referenced in by using this line in the "Help" tab
-
[Image:opdef:.?Image.jpg]
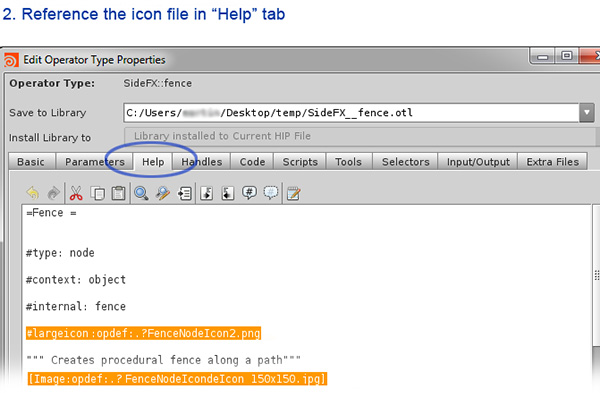
There is also an option in include a custom icon at the top of the help card.
This is referenced differently:
Note that png file with transparency is supported.
Creating High Dynamic range images
Posted on Jan 25, 2013
Posted on Jan 25, 2013
Creating HDR images
This post outlines a few different methods for creating HDR images.It continues where Part 1 and Part 2 of Image based lighting left off.
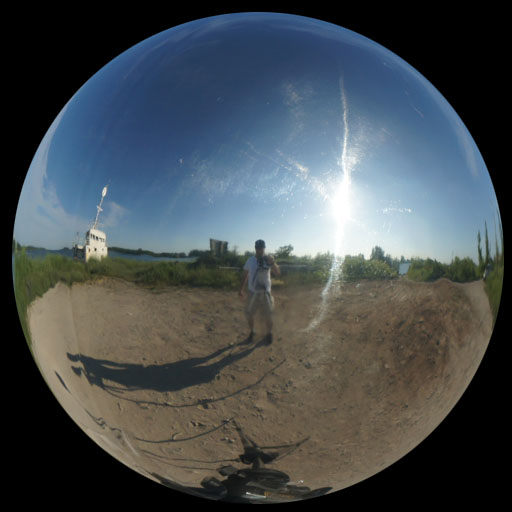
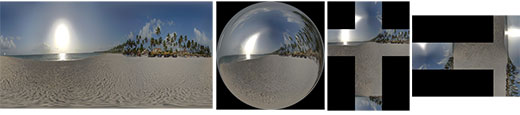
Mirrored Ball Method
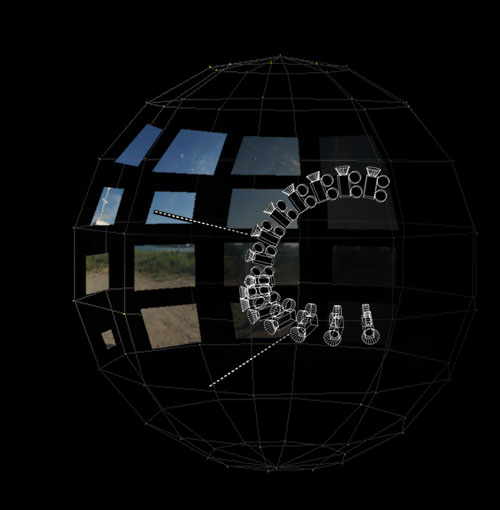
One of there easiest, and least effective ways to make an hdr image, is use "mirrored ball" approach. In this case, photograpsh need to be taken from a single perspective, at 10+ different exposures and merged in Photoshop or HDRshop.Surprisingly, when "unwrapped", this provides almost 360 degrees coverage. This approach also shows imperfections in the sphere itself. Note the scratches on the surface metal, the distortion of the surface, not to mention the fact that the photographer and his tripod are in the middle of the picture.

This is the jpg version of the resulting image in it's original "Mirrored Ball" layout.
Panoramic Transformations
Differnt 3D packages expect IBL images in different layouts. Houdini's environment light expects a LatLong layout (also called sphererical mapping). Below is the "unwrapped" version of the image.In this case, HDRshop was used to convert the "Mirrored Ball" layout to "LatLong". Artifacts such as the occluded area facing away from the camera, and the photogrphers reflection, were corrected in Photoshop.
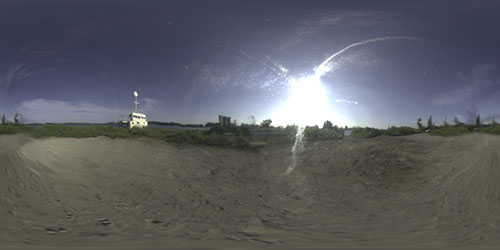
(HDR version Here).
Wide Angle Lens Method
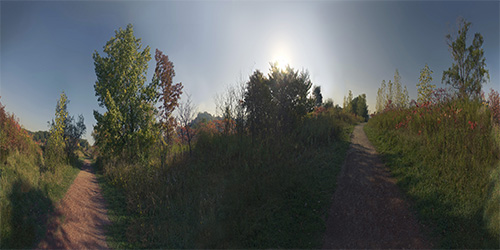
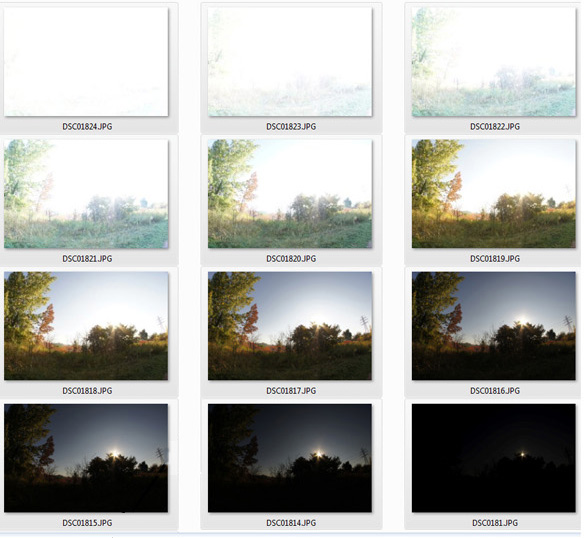
Another approach is to use an ultra wide angle lens. Depending on your camera, a 4-10mm lens can provide a nearly 180 degree field of view. With this much coverage, you can capture 360 degrees from 3 perspectives, which are later merged and stitched in Photoshop.
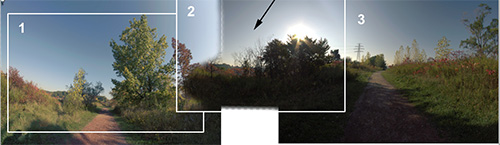
The trick with this approach is that the 3 perspectives must each be photomerged into their respective hdr images. Then the lens distortion must be removed. Then the three images need to be stitched together. This takes a lot of cloning and image manipulation, but the resulting image is high quality. Compared to the mirrored ball anyways...
Using a Pano head
By far the most labor intensive method is to use a panoramic head. This involves taking photos with a standard lens, from 48 perspectives to capture the entire 360 field of view. Keep in mind that you need 10+ exposures of each perspective. Then you need to merge and stitch the results.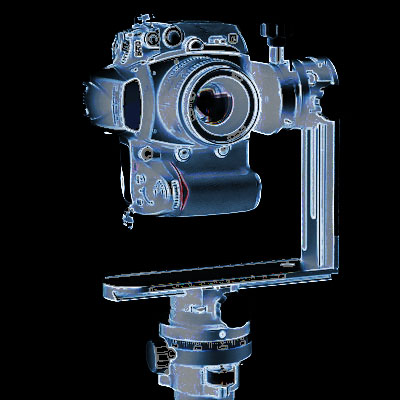
This is for the hardcore, to be sure.
People using this approach are known to hack their cameras firmware to automate the bracketing of shots. High speed and high capacity memory cards are required to handle the volume of RAW photos.
The time required to take so many photos usually results in ghosting artifacts: this is caused when objects such swaying trees and grass are in different positions from frame to frame. Lighting conditions can change with a passing cloud etc.
Usually dedicated software is required to handle the stitching.
Using a specialized camera
There is a company called Spheron which produces a specialized camera for just this task. For the ultra high end, this is probably the way to go.
Working With HDR images
Posted on Jan 24, 2013
Posted on Jan 24, 2013
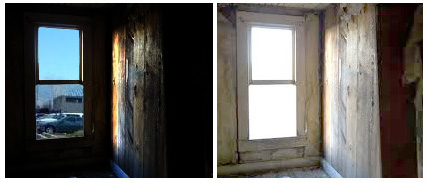
What's the problem with jpgs?
Typical photographs can either display extreme highlights or lowlights, but not both at once. In the example images below, note how the exposure allows either the interior room to be exposed, or the exterior parking lot. This makes them poor choices for use in IBL (image based lighting) and as displacement maps.This post is part 2 of a short series on image based lighting. Part 1 here .
Imitating real-world lighting
In real life, your eyeball can handle both lighting conditions at the same time. In order to create photo-realistic lighting in CG images however, you need wide range of exposures. In other words, a more dynamic range of lighting.HDR images contain multiple exposures and therefore produce better results than their jpeg counterparts. For example luminance values of jpeg can be recorded as values of 0-255 (black to white) vs an HDR which can have ranges of 0-20,000+ (negative black to super white)!
The photos above were use to create an HDRI for the HDR Path Environment Light asset.
Can my cell phone can do that?
Probaby not.Not all background images are created equal. To complicate matters, the term HDR has been hijacked by the consumer camera market. Lots of cameras and smartphones can take panoramas. Some will even do so at multiple exposures, combine them, and call this an HDR image....which it isn't. When several exposures are combined like this, and saved as a jpeg, the result is a "tonemap" of an HDR image. Although camera companies are using the term HDR..
High Dynamic Range Image format
Standard jpegs have 8-bits of information per channel. HDRs have 16 or 32 bits. So they take up more disk space and are only supported by a few formats such as Radiance (.hdr), Open Exr (.exr). Tiff-16, and Tiff-32 (.tif).
Very few cameras in the world shoot these natively. Usually one must purchase these images online, or create them in photoshop from multiple exposures.
When these images are used in a CG rendering context, one needs to be aware that the panorama can come in many different layouts. Just like a map of the world is like an unwrapped sphere, so is a panorama. Commercial HDR images (for rendering) can come in many standard layouts. These correspond to how the image will be applied to a virtual sphere or cube at render time.
Here are a few examples of environment map layouts:
Stay tuned for a post on creating your own HDR images!
Image Based Lighting Basics
Posted on Jan 23, 2013
Posted on Jan 23, 2013
Image Based Lighting Basics
It's fairly quick and easy to get photo-realistic results using image-based lighting.By using Houdini's built-in tools, or by supplying your own HDR (High-Dynamic Range) image, your renders can inherit a deep, rich color and shadows from real world locations.

The shelf tool "Environment Light" is a straightforward approach to IBL. Simply create the light and specify an image for it to use. This should be a panoramic image with 360 degrees of view. Also, you'll get much better results if you provide an HDR image (as opposed to a regular jpeg).
This is what a parorama in Latitude Longitude layout looks like:
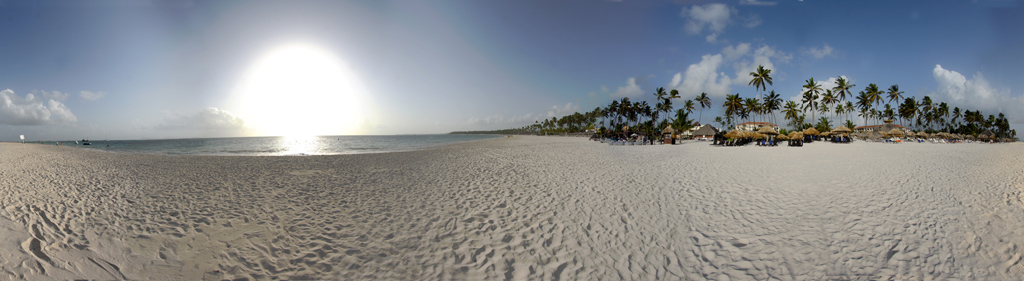
And here is an HDR version of this image to try in Houdini.
A high res version of this image will be found in an upcoming asset : envLight_HDR_Beach
Intro to the Environment Light
Once an image is chosen, the results can be seen immediately.Below is an image which demonstrates some of the various options for the light.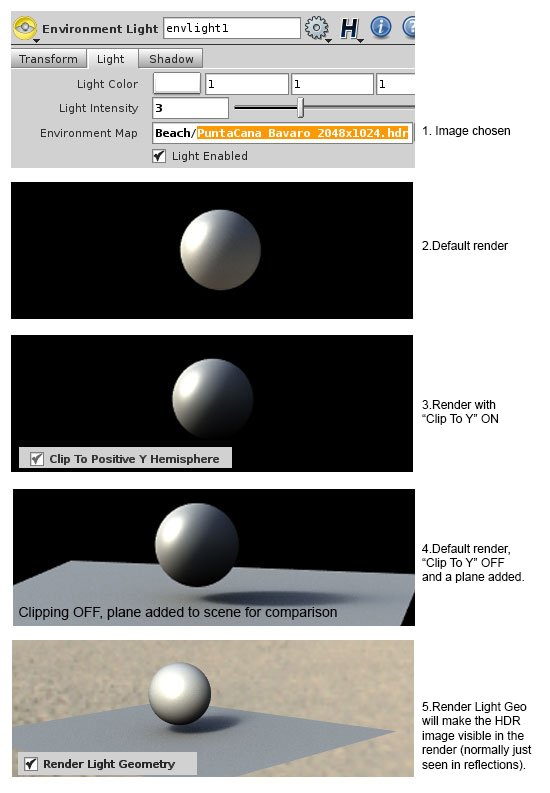
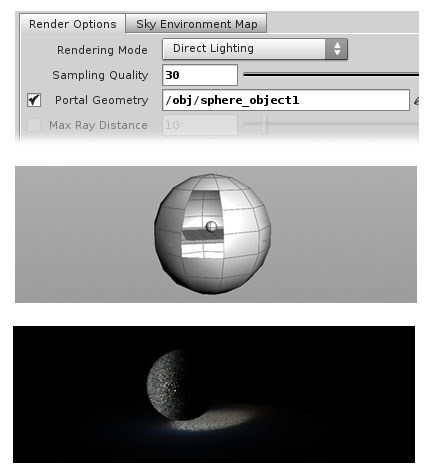
Portal Geometry
Another option is to include "Portal Geometry"This allows you to mask out part of your environment image so as to simulate outside light coming into a room through a window or open door. In the example below, a simple sphere with a few faces removed illustrates the dramatic effect Portal Geometry can have.
Once the portal geometry is specified in the light, and "Use portal" check ON. The original geometry can be be hidden. It will still affect the render untill checked off again.
Contest Winners!
Posted on Jan 23, 2013
Posted on Jan 23, 2013
Holiday Contest Results
A few weeks ago we announced a contest to create a holiday-themed image using assets from the Orbolt Smart 3D asset store. Check out some of the finalists here...Houdini Apprentice HD licences available to the top finalists!
So check your email if you entered the contest, cause we're sending you info on how to claim your prizes!

The contest was open to everybody, and there were several prizes to be won. At the top of our list were users dryulya for the entry "Jazz" (above), and GrosseVieSale for his work "Carte_Blanche" (below).

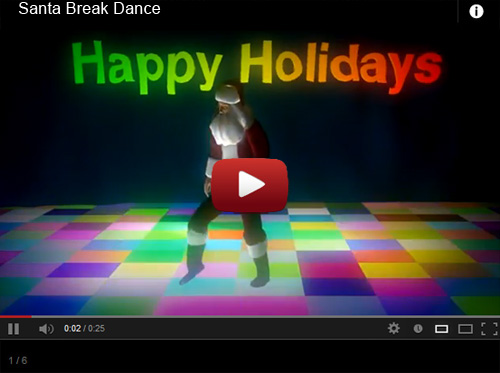
Some folks clearly had some fun with this contest. This dancing Santa really caught our attention. Pretty slick moves for a jolly old guy! The author informed us that a customized version of Male Motion Capture asset was used for this render.
This also shows that one of the benefits of an unlocked asset is that users can really adapt it to suit their needs, or tastes...or sense of humor!

Kudos to all who participated...watch your inbox 'cause we have a few runner-up prizes to give out. A hearty thanks to all!

Blog posts
- Welcome!
- Houdini Versions, Orbolt Assets, and You!
- Anatomy of creating a Houdini asset.. 1..2..3.. Profit!!
- Putting 'smart' in your Smart 3D Assets
- Houdini 12.5 is out!!!
- Assets In The Orbolt Cloud!
- To embed or not to embed.. multiple assets and example hip file.
- Asset Store Update!
- The Time to Start Building Assets is Now!
- Changing asset location
- Orbolt In Studio Environment
- Invalid License Signature fixed!
- Celebrity in the midst!
- Houdini 13 is released!!
- Powered by Houdini!
- Happy New Year!!
- Houdini Engine and Digital Assets!!
- Orbolt Updates!
- Engine Asset Creation!
- Maya Orbolt Browser!!
- Houdini Indie Released
- Asset Request Contest!!
- Indie Support!
- Asset Request Winner!!
- Houdini 14 Sneak Peek!!
- Houdini 14 Released!!
- Houdini Engine for UE 4!
- The Houdini 15 sneak peek is now online
- New Houdini demo reel online
- Houdini 15 released
- Houdini Engine Indie is free!
- Third Party Rendering is being added to Houdini Indie
- Houdini 15.5 released
- Houdini 16 coming soon
- Houdini 16 Down Under
- SideFX is proud to announce the release of Houdini 16.
- Orbolt in Houdini
- Houdini 16.5 Sneak Peek
- Houdini Scientific Engineering Award
- Houdini HIVE Presentations in Utrecht 2018
- Houdini 17 Banshee released!
- Embedded licenses in H17
- Houdini utilized in The Meg
- Global Game Jam with Houdini Contest 2019
- Character FX & Crowds Production Talks
- SideFX Australia Road Trip 2019
- Houdini HIVE at GDC 2019
- Houdini 17.5 Launch Event
- Houdini 17.5 Unveiled
- What is PDG?
- Houdini HIVE Paris 2019
- Dumbo - MPC
- Ant-Man and The Wasp
- SideFX Partners with Unity
- Houdini HIVE at SIGG 2019
- 2019 Houdini Reel
- SideFX Solaris
- Reindeer Ready
- Houdini 18 Launch Presentation
- Houdini HIVE at SIGGRAPH Asia 2019
- Houdini 18 Released
- Global Game Jam with Houdini Contest 2020
- A Real-Time Journey into Houdini
- Building a Procedural FX Pipeline for Age of Empires II
- COVID-19 Update
- Houdini HIVE GameDev - GDC Online
- Embedded Licensing for Studios
- Game Jam 2020 | Houdini Contest Winners
- Houdini HIVE Worldwide
- The Art of Houdini Tests
- Houdini HIVE Worldwide has arrived!
- Houdini and The Lion King
- Control | Remedy Entertainment
- Houdini 18 Backport
- HOULY Daily Challenge
- HOUDINI GAME JAM 2020
- Frozen 2 - Walt Disney Animation Studios
- We've reduced our fees!
- Project Blue Book - Stormborn Studios
- THE HOUDINI GAME JAM WINNERS! 2020
- Houdini 18.5 HIVE
- Houdini 18.5 Released
- Houdini HIVE - Education Edition
- Epic Games Invests in SideFX
- Absolute Post
- The Dawning
- Houdini HIVE Siggraph 2021
- Introducing WetaH
- Project Titan
- Sniper Elite 5 Trailer | Rebellion
- Houdini HIVE - FMX 2022
Press releases
Updates
- Please upgrade to a new build of Houdini 12.1
- We now support copy-protected free assets
- Add movies - Include a Vimeo or YouTube URL at upload time
- VOP Support
- Author Page Enhanced: change icon, add screen shots, rename asset...
- Rate it: Hot or not?
- OpenID bug fixed when syncing
- Including an example file gets faster activation.
- New assets: New Railway builder, new shaders, plus some cool utilities. A lot of these files are open for viewing so you can learn how the author put them together.
- Coming soon:
- Please Upgrade to Houdini 12.1.119 or Higher
- Updates to the Orbolt Smart 3D Asset store, Nov 8th.
- Holiday Contest is coming!
- Holiday Challenge is warming up as December approaches!
- Holiday challenge update!
- Holiday Card Assets
- How to contact an a author.
- What is this construction crew building?
- Anatomy of an Asset
- Anatomy of a Blackhawk 2
- Anatomy of a Blackhawk 4
- Anatomy of a Blackhawk 3
- Shadow Pass Recipe
- More Holiday Submissions
- Example File Guidelines
- Asset overview movies
- Contest Winners!
- Image Based Lighting Basics
- Working With HDR images
- Creating High Dynamic range images
- Adding Images to Help Cards
- Checkout problems with PayPal and Visa on Jan 28th 2013.
- How to add inputs to your asset
- Example files are good as Gold
- Major toolsets could be coming your way.
- March Contest
- High value assets can save you time and money.
- Valentine's day best wishes from the Orbolt Asset store.
- Houdini Artists love your work!
- Asset Author Tools; Upload Tips
- Uploading Dependencies via Author Tools
- March Contest Update
- St. Patrick's Contest Winner!
- Website Update!
- Side Effects Labs!