News
Asset overview movies
Posted on Jan 23, 2013
Posted on Jan 23, 2013
Asset overview movies
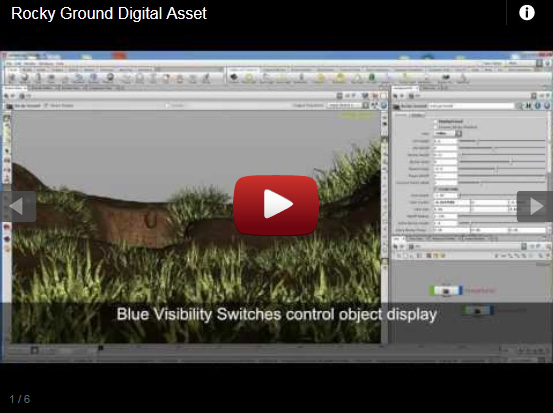
If a picture says a thousand words, then a video says 30 000 per second!
For example, a VIDEO was recently added to the Rocky Ground Asset asset to highlight a new feature. This is an easy way for users to learn about your asset, and any updates you may have added!
Example File Guidelines
Posted on Jan 24, 2013
Posted on Jan 24, 2013
- Not every feature need be highlighted.
- Captures the imagination/interest of the user.
- Demonstrates a literal, practical application.
- Preferably a production-case scenario of some sort.
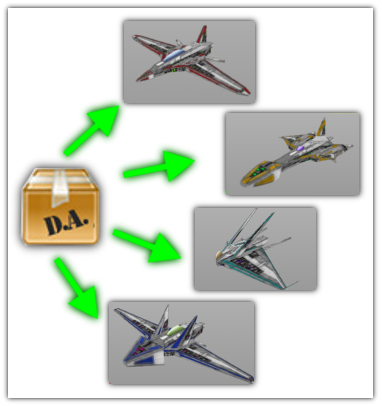
- Shows the asset is a configurable smart asset.
- Shows different instances of the asset in different configurations.
- A blank example file.
- A file that opens with "incomplete asset definition" errors.
- Looks quite different from the screen-shot image
- Dependencies are fine, as they are considered part of the single higher level asset.
- Use of other, non-dependent, assets should be avoided.
- If those non-dependent assets are really necessary, perhaps they should (artificially) become dependants of the asset in question.
- For example, if tool A's hip file absolutely needs to include tool B, then the author could create an instance of tool B inside tool A, to create an artificial dependency.
Author tip: Example hip files
What is the best way to show off your work? These guidelines can help...It's a topic we've had a bit of time to wrestle with, and after working though a few [hundred] cases, we've put together these guidelines:
Example files
What we hope for in an example file is something which..Demonstrates key features and value of the asset.
You can launch an example file directly from the Asset Browser using the Right mouse Button over the asset.:
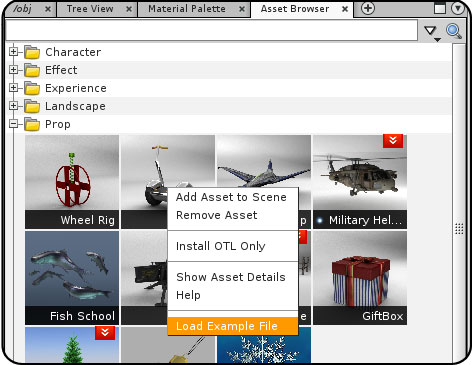
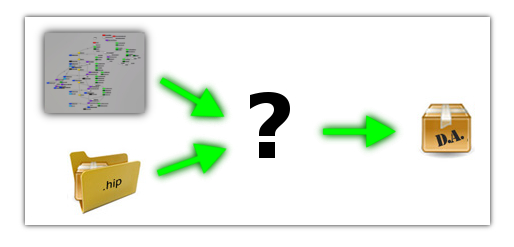
It is a goal of ours to have the user be able to click one asset in the store, and have it open in Houdini looking exactly like its screen shot preview. We really want to avoid the situation where the user downloads and asset, and gets...
Guidelines
Here are some possible guides to consider.When creating an example file...
The scope of the file should be a single asset.
If use of another, non-dependent, asset is necessary for some reason, consider one of these work-arounds:
Create an artificial dependency.
More Holiday Submissions
Posted on Dec 21, 2012
Posted on Dec 21, 2012
Holiday Challenge Submissions
Sounds like a wrestling move, looks like peace and goodwill to mankind...it's a contest!We've opened up the forum so that users can now upload images HERE . The Prize for best entry is a 1 year Apprentice HD subscription!
What are the contest details?
Simple, just create a holiday themed image using Houdini. Then post the results on the forum .
Or if you prefer, you can email them directly to support@orbolt.com
To make it even easier, we've posted several holiday assets to get you going.

(full image on the forum)

Want the file? Feel free to play with this author's Ornaments! Here's the hip file.
You'll need the Ornament , Pinetree and Screenshot Assets.
Here are the source images:
Fabric Colormap
Fabric Bumpmap
WindowReflectonMap
Here's a preview of one sent in via support@orbolt.com!


Keep 'em coming and claim your prize!
Shadow Pass Recipe
Posted on Jan 09, 2013
Posted on Jan 09, 2013
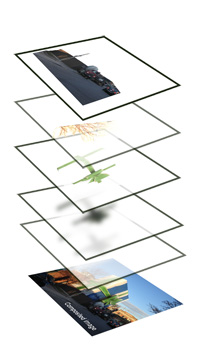
Intro to Layers
Ever notice that CG images tend to have really black shadows? The truth is, %100 black almost never occurs in real life.The "Shadow Pass" recipe, mentioned here is good for all compositors. Give it a try next time you're comping a shadow pass.
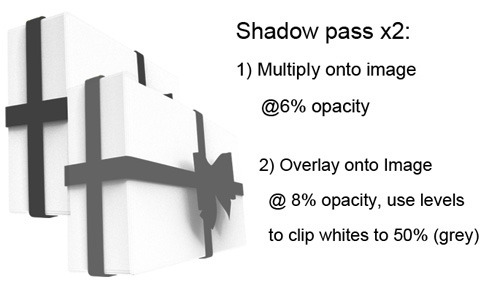
Shadow Recipe
If you were planning on multiplying the shadows at 20% opacity, try 10% instead. Then duplicate the shadow layer and change the apply mode to overlay. On this second shadow pass, apply a levels operation and clip (reduce) the whites by %50. In other words, this overlay layer will have only %50 grey or darker in it.
That's it! Your shadows will be a rich dark color, but not overly black or muddy.
Basic composite example
The following example illustrates how a single CG element was hastily composited onto a photograph. This particular example was done in Photoshop, but the workflow is pretty much the same in Nuke, After Effects or any other package.
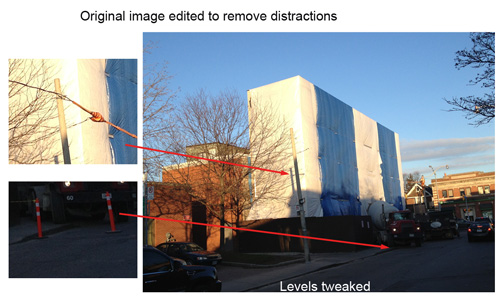
Step 1: Clean-up the image
The backplate (photo) was taken with an iPhone as the owner went to work. There were some obvious problems with it; Utility lines and hazard pylons just to name a few. These were edited out just to reduce the clutter of the image. Then the levels were adjusted to lighten the forground shadows a little.
Step 2: Import CG elements
The goal for this shot was to simply add a big bow to the building. The Giftbox Asset was used to creat a big ribbon around a box shape. A beauty pass and cast shadow pass were rendered.
Bear in mind, that in a production setting, this "beauty pass" would itself have been a composite of about 10 layers! e.g. Diffuse Color, Specular, Ambient Occlusion, Subsurface, Reflection etc..

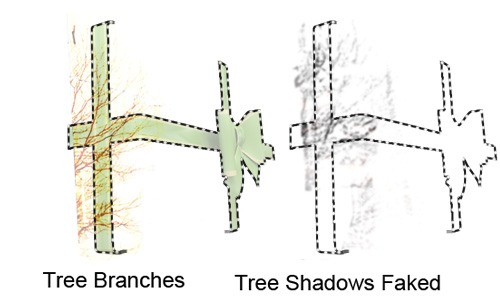
Step 3: Shadows on the building
This is just a quick exercise, so only one beauty pass, and one cast shadow pass were created. This means that the shadows inside the bow itself will not benefit from the shadow pass recipe. It will only affect the shadows cast upon the building.
This shadow pass was rendered using a box as a stand-in for the building. This box had a shadowmatte material applied to it.
Some shadows had to be faked. In this case the shadow of the tree branches had to be added to the bow in order to match the building.
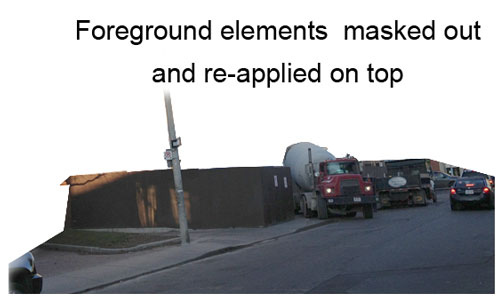
Step 4: Re-Apply Foreground
The foreground fence, tree branches and utility pole, needed to be duplicated from the background, and then re-applied over the bow. This was a manual masking or roto task. The edges of this foreground layer needed to be blurred so as to not appear overly sharp and artificial.
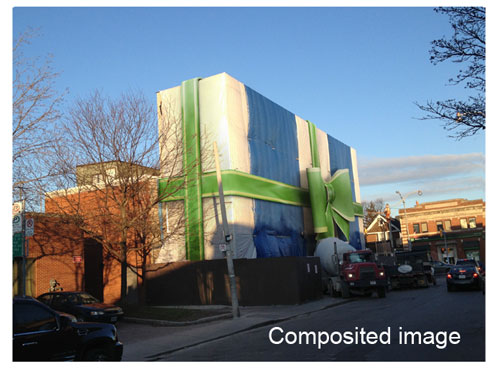
Step 5: Final Composite
Here is the composited image: A gift wrapped building. Some nice touches would be to adjust the bows color levels a bit, to add a specular pass, and maybe some noise to further sell it's integration with the photograph.
Happy Holidays!
Putting 'smart' in your Smart 3D Assets
Posted on Dec 21, 2012
Posted on Dec 21, 2012
-
Putting 'smart' in your Smart 3D Assets.. ways to improve your assets
In this blog we'll dig a little bit deeper and look at what makes a useful asset, and what exactly makes it 'smart'. Houdini digital assets allow the user to take their setup and wrap it into a single node. The author decides which controls will be useful and adds them to the top level. This in itself makes assets a great tool as it lets others use them without having to worry how they work.
This touches on our first point which is asset purpose and abstraction. When creating a new asset or taking an existing setup and generating one out of it; it's useful to ask ...what is it's purpose?. Having a clear target to shoot for, makes the creation process easier and lets the author be consistent about the functionality. If the task to solve is a complex problem, break it down into smaller/simpler steps and create assets to solve these. Each asset tackles one aspect of the problem and solves it. By having individual components it helps to hide all the gory details that might be needed and abstract it into a simple concepts that a user will understand.
As you build the asset, keep modularity and flexibility in mind. In terms of modularity the asset should contain all the needed pieces to function. This makes it easier to update later as you only need to edit single asset; instead of multiple ones. It's certainly possible to create an asset that has hundreds of controls and does multitude of jobs but when it comes to either fixing/updating, it becomes significantly more difficult. If it needs additional information try to set clear ways that the asset can get it (whether that's controls for merging additional geos, getting camera/lights/bones info, or writing out geometry to disk).
It's a good idea to ask yourself which parts of the asset can be made procedural. Doing this during the build phase makes it easier rather than trying to procedurlize it after the fact. It will let you add specific controls and create a robust and flexible asset that has a lot of functionality. One thing to keep in mind is not to go overboard though. Houdini lets you easily add additional options and soon you might find yourself adding everything but the kitchen sink. Try to avoid the temptation :) If there's other piece of functionality that you think would be great to have, see if it's maybe a better candidate for another asset.
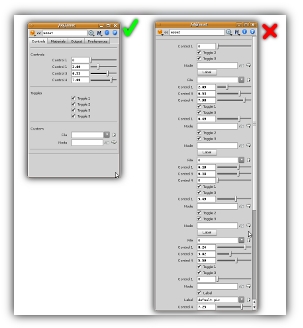
It's the little things.. some additional things to keep in mind as you create your Smart 3D Assets. Grouping your controls by functionality will makes things easier to learn and use by new users. Setting proper defaults/min/max ranges will guide the users and make it easier to know what are acceptable values (if need be you can also lock the controls in Type Properties to place hard limits). Creating asset presets is a great way to show off the asset. One of the best ways to explain and demonstrate your creation is by showing it off with an example hip file. You can upload to Orbolt and the user will be able to learn from it. Describing the controls in the Help section as well as giving tips/tricks is another way to make it more useful (you 'did' write the Help docs.. right? :)
Keeping the above in mind will help you in creating a great asset, that will be easy to use and allow you to change/update without too much hair pulling. If you have any questions or comments, feel free to contact us at support@orbolt.com.
Also, have a look at Old Schools digital asset discussions for some great info. Old School Blog
Anatomy of a Blackhawk 4
Posted on Jan 24, 2013
Posted on Jan 24, 2013
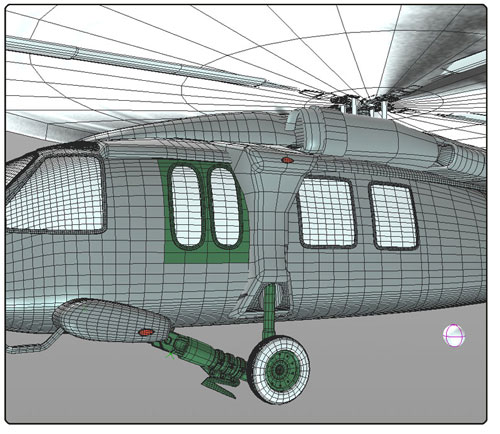
Anatomy of a Blackhawk 4
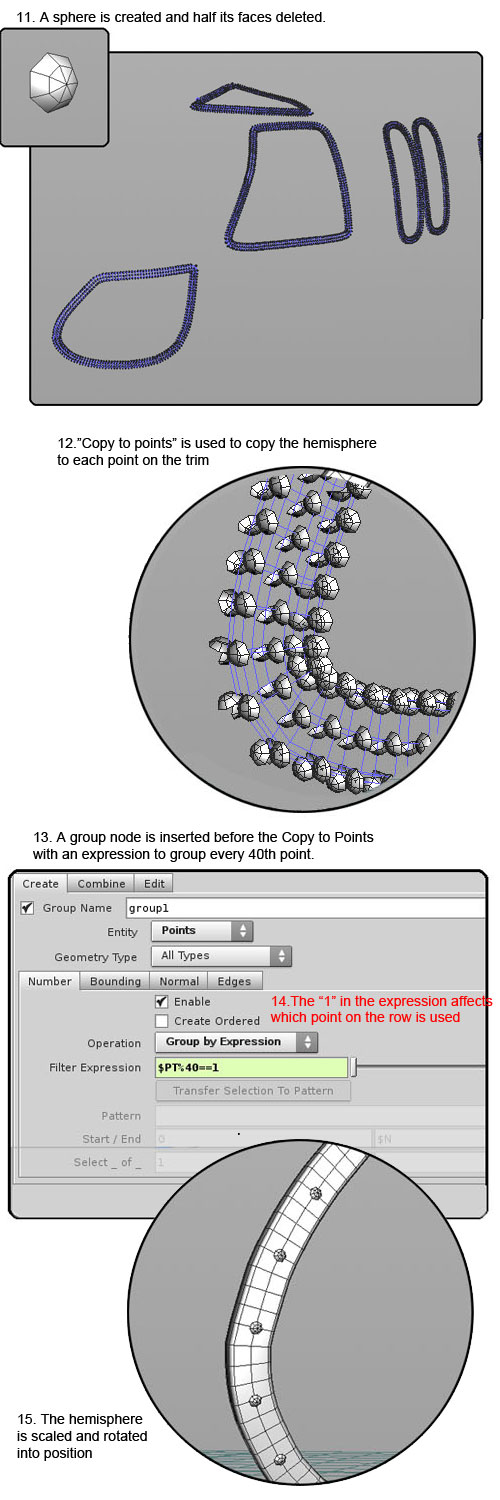
At this point, the basic hull, windows, and doors have been roughed in. Later we will examine the addition of extra details, surfacing and behaviors.
Anatomy of a Blackhawk 3
Posted on Jan 24, 2013
Posted on Jan 24, 2013
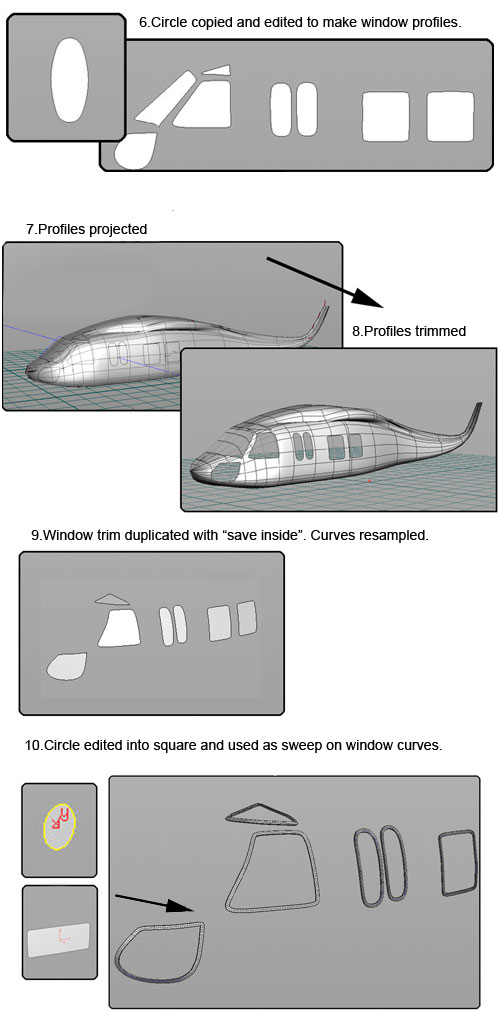
Anatomy of a Blackhawk 3
After creating on half of the hull, it was necessary to add windows and door openings. This was done by creating outlines and then projecting them on the hull surface.
The results were trimmed; keeping the inside of the trim for windows and doors, and the outside for the hull.
NEXT
Anatomy of an Asset
Posted on Mar 13, 2013
Posted on Mar 13, 2013
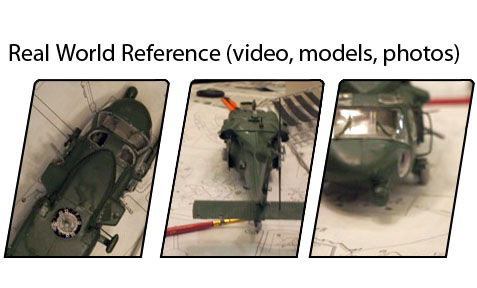
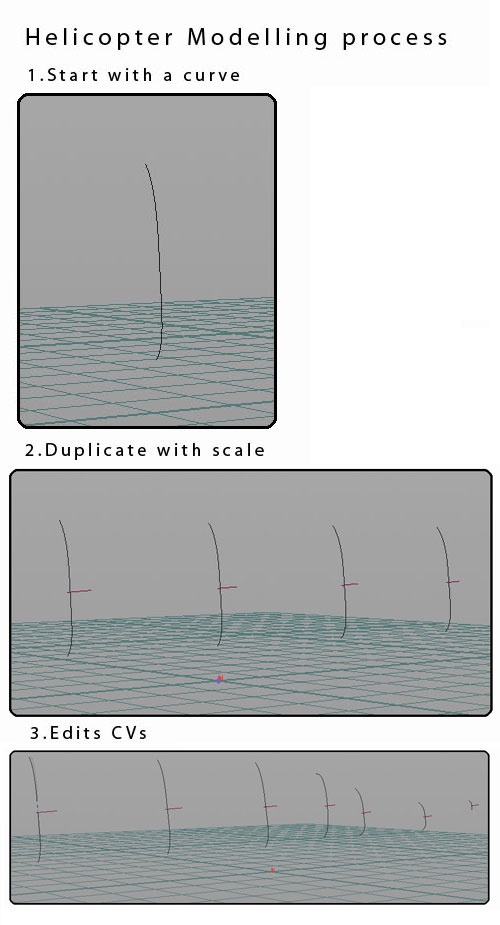
Anatomy of An Asset
Ever wondered what goes on under the hood a digital asset? This blog takes a look at the modelling and early development of the Military Helicopter AssetFirst you need to start with some reference material. In this case photos of a plastic hobby kit were used
These reference images were imported into the background display preferences and then used as a guide to lay down some curves.
NEXT
Anatomy of a Blackhawk 2
Posted on Jan 24, 2013
Posted on Jan 24, 2013
Anatomy of a Blackhawk 2
The process of duplicating, mirroring and then joining the sides, results in a surface that is neat and orderly (all the edges meet nicely). The basic process is to model one side and mirror it. Then model the top, and mirror it. Then tweak, then join.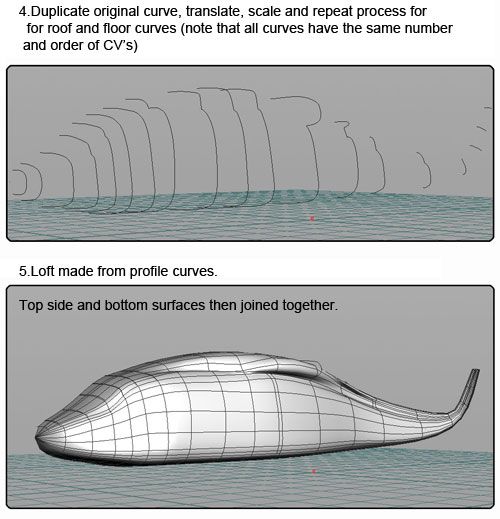
NEXT
What is this construction crew building?
Posted on Dec 21, 2012
Posted on Dec 21, 2012
Reno Madness?
What exactly is this construction crew doing? The Holiday Challenge continues! Prizes!
See the full image, and others HERE .
Best entries will receive an Apprentice HD subscription!
Contest details:
Create a holiday themed image using Houdini. Then post the results on the forum .
Or if you prefer, you can email them directly to support@orbolt.com

Here are some free holiday assets to get you going.
Blog posts
- Welcome!
- Houdini Versions, Orbolt Assets, and You!
- Anatomy of creating a Houdini asset.. 1..2..3.. Profit!!
- Putting 'smart' in your Smart 3D Assets
- Houdini 12.5 is out!!!
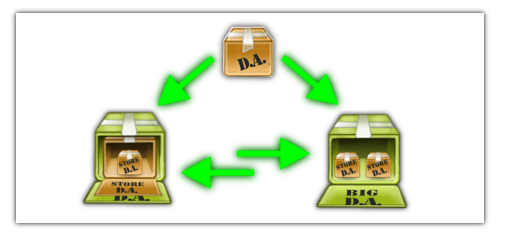
- Assets In The Orbolt Cloud!
- To embed or not to embed.. multiple assets and example hip file.
- Asset Store Update!
- The Time to Start Building Assets is Now!
- Changing asset location
- Orbolt In Studio Environment
- Invalid License Signature fixed!
- Celebrity in the midst!
- Houdini 13 is released!!
- Powered by Houdini!
- Happy New Year!!
- Houdini Engine and Digital Assets!!
- Orbolt Updates!
- Engine Asset Creation!
- Maya Orbolt Browser!!
- Houdini Indie Released
- Asset Request Contest!!
- Indie Support!
- Asset Request Winner!!
- Houdini 14 Sneak Peek!!
- Houdini 14 Released!!
- Houdini Engine for UE 4!
- The Houdini 15 sneak peek is now online
- New Houdini demo reel online
- Houdini 15 released
- Houdini Engine Indie is free!
- Third Party Rendering is being added to Houdini Indie
- Houdini 15.5 released
- Houdini 16 coming soon
- Houdini 16 Down Under
- SideFX is proud to announce the release of Houdini 16.
- Orbolt in Houdini
- Houdini 16.5 Sneak Peek
- Houdini Scientific Engineering Award
- Houdini HIVE Presentations in Utrecht 2018
- Houdini 17 Banshee released!
- Embedded licenses in H17
- Houdini utilized in The Meg
- Global Game Jam with Houdini Contest 2019
- Character FX & Crowds Production Talks
- SideFX Australia Road Trip 2019
- Houdini HIVE at GDC 2019
- Houdini 17.5 Launch Event
- Houdini 17.5 Unveiled
- What is PDG?
- Houdini HIVE Paris 2019
- Dumbo - MPC
- Ant-Man and The Wasp
- SideFX Partners with Unity
- Houdini HIVE at SIGG 2019
- 2019 Houdini Reel
- SideFX Solaris
- Reindeer Ready
- Houdini 18 Launch Presentation
- Houdini HIVE at SIGGRAPH Asia 2019
- Houdini 18 Released
- Global Game Jam with Houdini Contest 2020
- A Real-Time Journey into Houdini
- Building a Procedural FX Pipeline for Age of Empires II
- COVID-19 Update
- Houdini HIVE GameDev - GDC Online
- Embedded Licensing for Studios
- Game Jam 2020 | Houdini Contest Winners
- Houdini HIVE Worldwide
- The Art of Houdini Tests
- Houdini HIVE Worldwide has arrived!
- Houdini and The Lion King
- Control | Remedy Entertainment
- Houdini 18 Backport
- HOULY Daily Challenge
- HOUDINI GAME JAM 2020
- Frozen 2 - Walt Disney Animation Studios
- We've reduced our fees!
- Project Blue Book - Stormborn Studios
- THE HOUDINI GAME JAM WINNERS! 2020
- Houdini 18.5 HIVE
- Houdini 18.5 Released
- Houdini HIVE - Education Edition
- Epic Games Invests in SideFX
- Absolute Post
- The Dawning
- Houdini HIVE Siggraph 2021
- Introducing WetaH
- Project Titan
- Sniper Elite 5 Trailer | Rebellion
- Houdini HIVE - FMX 2022
Press releases
Updates
- Please upgrade to a new build of Houdini 12.1
- We now support copy-protected free assets
- Add movies - Include a Vimeo or YouTube URL at upload time
- VOP Support
- Author Page Enhanced: change icon, add screen shots, rename asset...
- Rate it: Hot or not?
- OpenID bug fixed when syncing
- Including an example file gets faster activation.
- New assets: New Railway builder, new shaders, plus some cool utilities. A lot of these files are open for viewing so you can learn how the author put them together.
- Coming soon:
- Please Upgrade to Houdini 12.1.119 or Higher
- Updates to the Orbolt Smart 3D Asset store, Nov 8th.
- Holiday Contest is coming!
- Holiday Challenge is warming up as December approaches!
- Holiday challenge update!
- Holiday Card Assets
- How to contact an a author.
- What is this construction crew building?
- Anatomy of an Asset
- Anatomy of a Blackhawk 2
- Anatomy of a Blackhawk 4
- Anatomy of a Blackhawk 3
- Shadow Pass Recipe
- More Holiday Submissions
- Example File Guidelines
- Asset overview movies
- Contest Winners!
- Image Based Lighting Basics
- Working With HDR images
- Creating High Dynamic range images
- Adding Images to Help Cards
- Checkout problems with PayPal and Visa on Jan 28th 2013.
- How to add inputs to your asset
- Example files are good as Gold
- Major toolsets could be coming your way.
- March Contest
- High value assets can save you time and money.
- Valentine's day best wishes from the Orbolt Asset store.
- Houdini Artists love your work!
- Asset Author Tools; Upload Tips
- Uploading Dependencies via Author Tools
- March Contest Update
- St. Patrick's Contest Winner!
- Website Update!
- Side Effects Labs!